Several weeks ago, when cleaning the house, I am
accidentally drop my WD MyBook world when trying to rearrange its location in
the house. This ending up damaging the hard disk causing me a lot of data lost.
Luckily, some of the necessary data already been backing up on another NAS
(Synology 2-Bay drive).

WD MyBook world that contained broken hard disk

Disassembly of WD MyBook wold NAS to replace broken hard disk

photo of Synology NAS drive
There is a lot of solutions on the internet how to reinstall fresh system on the new HDD on the WD MyBook world. One of it is from Polish guy from the website iknowsomething.com (thanks to him). It was my main reference when doing my firmware installation. However, I find a lot of difficulties, to get everything done firstly, with the hard disk wipe-out and secondly with the mdadm packaging not available in the Ubuntu package
To make it easy, here I listed the procedure I followed till I managed to make my WD MyBook world back to working again;
1)purchased same or similar brand and size of the hard disk, in my case,is WD Caviar Green 2TB.

photo of WD hard disk (this is not an actual hard disk)
2) Then any Ubuntu DVD version above 10.10 is required, which can help prevent the problem with 'mdadm' package installation when firmware is being install on the hard disk. I faced a lot of hassles with mdadm package, which ending up with my firmware installation being failed.
I used Ubuntu 11.04 DVD, and that can be download from torrent. I tried with Ubuntu 10.10 CD version, 11.04 CD version and 12.10 CD version, but all ending up a having the problem with package mdadm unable to install
Download version 11.04 DVD version of Ubuntu from link below and install on the DVD.;
3)download all needed files and firmware for installation from website link below
this is an actual procedure I’m followed, credit to the guy who prepared).
this is an actual procedure I’m followed, credit to the guy who prepared).
*so, at this stage, you need to have several things ready.
1) HDD replacement with sata to usb converter,
2)Ubuntu DVD image installed on DVD,
3)mbwe tar package file (prepared in usb drive)
4)finally firmware (also prepared in the usb drive)
4)wipe out hard disk using Ubuntu or windows to unformatted state. Refer to screen shot below

First connects the hard disk that will replace broken hard disk, followed by opening disk management application in windows : start>control panel>system and security>administrative tools>disk management
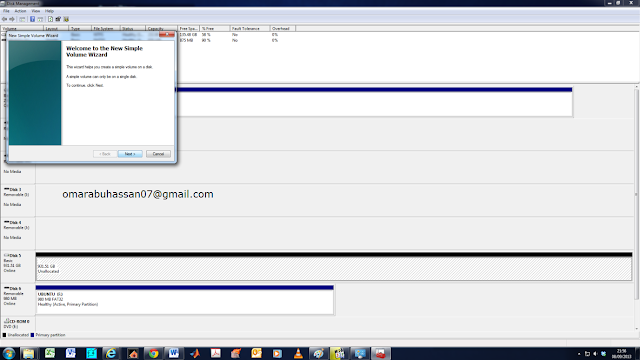
Then select the disk that you just connect to the computer. After that, delete
the volume of the hard disk, then create new simple volume as shown in the picture above. Click next after that.


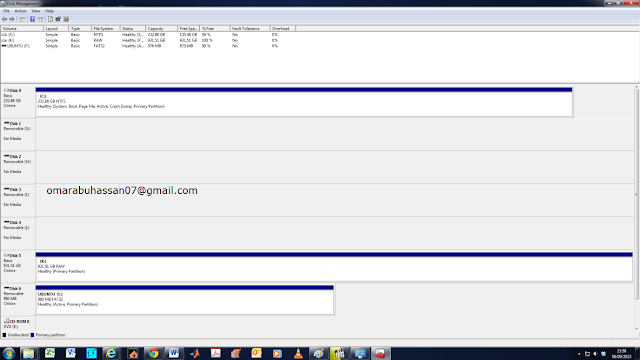
Tada, ‘unformatted drive’ is created (refer to disk 5 in the image above). Picture show screen shot of unformatted state drive (Raw state).

First connects the hard disk that will replace broken hard disk, followed by opening disk management application in windows : start>control panel>system and security>administrative tools>disk management

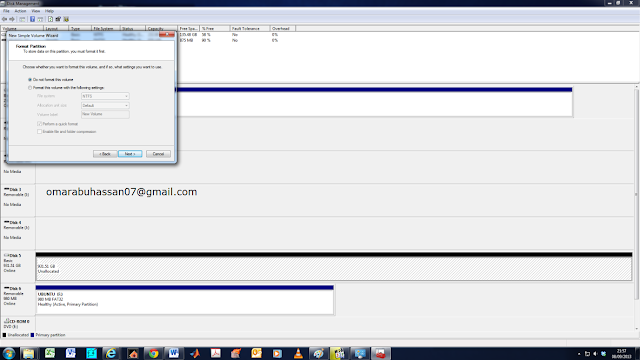
Then select the disk that you just connect to the computer. After that, delete
the volume of the hard disk, then create new simple volume as shown in the picture above. Click next after that.

Click next again (no need to set anything here)

Click next again (tick assign drive letter)

Tick ‘do not format this volume’ and click next again.

Tada, ‘unformatted drive’ is created (refer to disk 5 in the image above). Picture show screen shot of unformatted state drive (Raw state).
Now, safely remove the hard disk from windows computer and ready for the next step.
5) prepared computer with the internet connected through the cable. Then, load Ubuntu from DVD (don’t install it, just try Ubuntu)

Then, search synaptic package manager, and open it.
Then, update/install mdadm package.refer to screen shot below.

Drag both into the desktop and extract the mbwe.tar.gz file into the desktop.
Then, open mbwe folder and display mbwe-config. There are 4 information require to be fill.
DISK_LABEL, MBWE_SERIAL, MBWE_MODEL, MAC_ADDRS. Next step will explain how to get this info in graphical order.


6)connect the usb drive containing mbwe.tar file and firmware image file.
Drag both into the desktop and extract the mbwe.tar.gz file into the desktop.
Make sure extracted file is named as mbwe. Then, dragged the firmware image into mbwe folder and rename it fw.img.
Then, open mbwe folder and display mbwe-config. There are 4 information require to be fill.
DISK_LABEL, MBWE_SERIAL, MBWE_MODEL, MAC_ADDRS. Next step will explain how to get this info in graphical order.

mbwe.tar.gz is extracted onto desktop and, mbwe folder is created (see picture).

Open mbwe folder and verify that folder contained 4 file as above.

Open mbwe-config.sh file using the text.
 Four things that needed attention.a) DISK_LABEL, b)MBWE_SERIAL, c)MBWE_MODEL and d)MAC_ADDRS.
a))for DISK _LABEL, open ‘disk utility’ by using the searching function in Ubuntu.

picture of disk utility
Then, check the label for HDD
For example,Disk_label=sda based sample image below

On picture: look at device section, /dev/sda, meaning that disk_label =sda.
b)MBWE_SERIAL: refer to the bottom white case of your MyBook.
c)MBWE_MODEL: if yours is MBWE 1 disk version, choose WDH1NC, or MBWE II 2 disk version choose WDH2NC.
d)for mac address refer to bottom case of your MyBook.
#after this step, you are ready to install the firmware, and it will only 60-90 seconds to complete if everything goes right.
7) the next step is to go into terminal to complete the installation of the firmware.

Open terminal page

Type <cd Desktop/mbwe> and press enter

Then type <sudo bash ./mbwe-install.sh> and press enter.
After the action above, follow step-by-step instruction from
terminal until firmware installation complete.
Once this step is complete, hard disk can be unmounted in
the disk utility application.
8) assemble the hard disk back into MyBook
world casing to initialize final step to make WD MyBook world working again.
9)Connect WD MyBook world to the
power outlet and switch it on, don’t forget to connect LAN cable from WD MyBook
to router.
Wait 30 seconds for WD Mybook world initialize and shutdown itself (all 8 front led go off). Then, press power button at the back of the MyBook world for 3 seconds until led at the bottom goes on until it boot up.
To make it easier to go into web GUI of MyBook world page, use WD discovery software. The default login and password is admin and admin
10) Go through the web gui to setup
and change the password. Do not forget to check for the firmware update in the
web GUI page.
That’s all. Hope this guide help
This hard disk repair solution is so useful but one thing I want to ask is that can we all have the stored data retrieve I mean nothing will be lost if the hard disk is broken?
ReplyDeleteThanks for the useful Information...
ReplyDeleteBigo Live Stream users